
I Bought a Domain. How Do I Get Email on It?
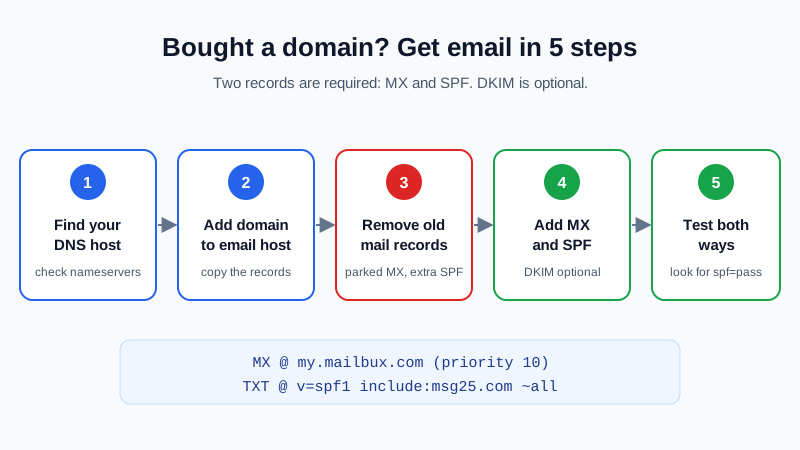
A domain name on its own does not come with a mailbox. To get email on a domain you just bought, you need two things: an email host that stores and sends your mail, and two DNS records at whoever runs your domain's DNS: an MX record (where incoming mail goes) and an SPF record (which servers may send as your domain). The hands-on part takes about 15 minutes. DNS changes usually show up within an hour, sometimes up to 48 hours.
You can do this for free. The Mailbux Free plan is free forever: 7 GB of shared storage, 1 domain, webmail, the Mailbux apps and SMTP sending, and outgoing mail carries a small "Sent via Mailbux" footer. Below is the checklist for the first hour after buying a domain, in the order that avoids lost mail.
What you have now, and what you don't
| Item | Comes with a new domain? | What it does |
|---|---|---|
| Domain name | Yes | The name itself, rented for a year or more |
| DNS hosting | Usually, at the registrar | The list of records that tells the internet where your website and mail live |
| Website | Sometimes a parked page | Pages people see in a browser |
| Email forwarding | Some registrars include it | Passes incoming mail on to another address; you usually can't send as your domain |
| Mailbox | No (often a paid add-on or trial) | Stores mail and lets you send as you@yourdomain |
So the missing piece is the mailbox. Email and your website are separate services, which means you can set up email today without touching (or even having) a website. If you have no site yet, see custom domain email without a website.
Step 1: Find out who runs your DNS
Your DNS records live wherever your domain's nameservers point. Right after purchase that is normally the registrar. But if you connected the domain to a site builder or moved it to a DNS service, the records are edited there instead, and changes made at the registrar do nothing.
- Open your registrar account and look at the domain's nameserver setting. "Default" or the registrar's own names means you edit DNS at the registrar.
- Or check from your computer: run
nslookup -type=NS yourdomain.com(Windows, Mac or Linux) ordig NS yourdomain.com. The names in the answer show who hosts your DNS. - Write it down. Every record below goes to that one place.
Registrar-specific screens: free email with a GoDaddy domain and free email with a Cloudflare domain.
Step 2: Choose where your mail will live
There are four common routes. Pick one before you change any record, because each one needs its own MX record and only one can receive your mail.
- A free email host on your own domain: real mailboxes, send and receive as your address, no monthly bill. Check what "free" includes; see our comparison of free business email options.
- The registrar's own mailbox: convenient, but often a trial or paid add-on.
- Forwarding only: fine for a hobby address, weak for business because replies come from your personal address.
- A paid suite: when you need desktop clients, many mailboxes or extra storage. Compare plans on our pricing page.
Step 3: Add the domain to your email host
With Mailbux it works like this:
- Create a free account at dash.mailbux.com. New accounts start in the onboarding wizard.
- Open Services → your plan → Manage → Domains and choose Add domain.
- Enter your domain (for example
yourcompany.com) and save. - Open Domains → Open DNS setup. It lists every record with a copy button, so you never type a value by hand.
Step 4: Clear the registrar's default mail records
Many registrars add mail records to a new domain: MX records for a parked mailbox or a forwarding service, and sometimes an SPF record for their own mail servers. Left in place, they compete with your new host and some mail lands in the wrong place.
- MX records: delete the ones that point to the registrar's mail or forwarding servers, unless you still use that service.
- SPF: a domain may have only one TXT record that starts with
v=spf1. If one exists, edit it rather than adding a second. Two SPF records make SPF fail. See how to merge multiple SPF records. - Leave website records alone: A, AAAA and CNAME records for
@andwwwrun your site, not your mail.
Step 5: Add the MX and SPF records
These are the only two required records for Mailbux:
| Type | Host / Name | Value | Priority |
|---|---|---|---|
| MX | @ | my.mailbux.com | 10 |
| TXT (SPF) | @ | v=spf1 include:msg25.com ~all | — |
"@" means the domain itself. Some DNS screens want the field left blank or the full domain instead; the record does the same thing. If your SPF record already lists another sender you still use (for example a newsletter tool), keep it and add include:msg25.com to the same record.
Optional: add DKIM. In your Mailbux service, open DKIM and create the key. Then copy the DKIM TXT record shown in Domains → Open DNS setup to your DNS host. One DKIM record is enough. It is optional and improves deliverability. A DMARC record can come later, once mail is flowing; its value is in the same Open DNS setup screen. More detail on each record: how to add DNS records for your email domain.
Step 6: Create your mailboxes
Open Manage → Mailboxes and choose Create mailbox. Enter the address, a display name, a strong password and the storage for that mailbox. The Free plan includes up to 7 business mailboxes, so a small team can start with one per person plus a role address such as info@ or hello@.
Read mail in Mailbux webmail or the Mailbux apps. Standard IMAP and POP3 access for clients like Outlook or Apple Mail is available on paid plans, so on Free you use webmail and the apps.
Step 7: Test before you tell anyone your address
- In Domains → Open DNS setup, choose Re-check now until MX and SPF show as found.
- From a personal address, send a message to your new address. Check it arrives.
- Reply from your new address. In the personal mailbox, open the message details or original headers and look for
spf=pass. - Check the spam folder on the receiving side. A new domain can need a few days of normal, wanted mail to build a reputation.
If mail doesn't arrive after an hour, the usual cause is a record added in the wrong place (see Step 1) or an old MX left behind. Our guide on checking that your email DNS records are correct walks through each test.
Step 8: Protect the domain and the address
- Turn on auto-renew at the registrar. When a domain expires, its email stops; see what happens when a domain expires.
- Turn on two-factor sign-in at the registrar and on your mailbox. Whoever controls the DNS controls your mail.
- Use the new address everywhere: website contact page, invoices, business listings and your signature.
Common first-hour mistakes
- Editing DNS at the registrar while the nameservers point somewhere else.
- Adding a second SPF record instead of editing the first.
- Deleting the website's A or CNAME records while cleaning up.
- Typing a value by hand instead of copying it; a missing dot or space breaks it.
- Announcing the address before a test message went both ways.
Frequently Asked Questions
Does buying a domain give me an email address?
Usually not a working mailbox. Most registrars offer a mailbox as a paid add-on or a trial, and some include forwarding only. You need an email host plus MX and SPF records at your DNS provider.
How long until email on a new domain works?
Most DNS changes show up within an hour. Some networks keep old answers for up to 48 hours, so test before you rely on it.
Do I need a website to have email on my domain?
No. Email uses MX and TXT records, which work whether or not a website exists.
Can I use Outlook or Apple Mail with the free plan?
Standard IMAP and POP3 access for clients like Outlook or Apple Mail is available on paid plans. On the Free plan you use Mailbux webmail and the Mailbux apps.
Will my emails show any branding on the free plan?
Yes. Outgoing mail on the Free plan carries a small "Sent via Mailbux" footer.
Email on your new domain
Mailbux gives you email on your own domain with webmail and mobile apps, copy-and-paste MX, SPF, DKIM and DMARC values under Domains → Open DNS setup, two-factor authentication and app passwords, and a free migration tool if you later move mail in from another provider. Compare the options on our pricing page.