
How to Set Up Email on a Custom Domain Without a Website
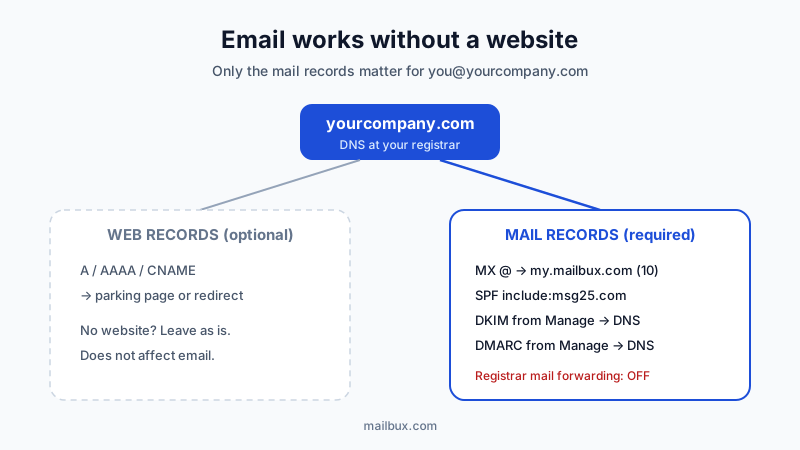
You bought a domain, you have no website yet, and you want an address like [email protected] today. Good news: email does not need a website. A domain can send and receive mail with nothing but a few DNS records, and the website can come months later (or never).
This guide walks through the exact steps for a domain that has no site, plus the three things that most often go wrong on "bare" domains: the registrar's own mail forwarding, the parking page, and missing records.
Why email works without a website
Your domain is just a name. What it does is decided by its DNS records, and each kind of record does a separate job:
- A / AAAA / CNAME records tell browsers where your website lives. With no website, you can leave them on the registrar's parking page or remove them.
- MX records tell other mail servers where to deliver mail for your domain.
- TXT records (SPF, DKIM, DMARC) prove which servers may send mail as your domain.
Email only uses MX and TXT records. Nothing about mail delivery checks whether a website exists. If you want the background, see our explanation of email hosting vs web hosting.
What you need before you start
- Access to your domain's DNS. On a domain without a website this is almost always the registrar account where you bought it. Look for a section called DNS, DNS records, Zone editor or Advanced DNS.
- An email host account. You do not need a web hosting plan. A dedicated email host is enough.
- 10 to 20 minutes. Most changes are visible within an hour.
Step 1: Add your domain to your email host
In Mailbux, create an account, then add your domain. The dashboard then shows the exact DNS values for that domain under Manage → DNS. Keep that page open; you will copy from it in the next steps.
Step 2: Turn off the registrar's built-in email forwarding
Many registrars switch on a free "email forwarding" feature for new domains. It works by publishing the registrar's own MX records. If you leave it on, you end up with two sets of MX records, and some of your mail goes to the registrar's forwarder instead of your mailbox.
- Find "Email forwarding", "Mail forwarding" or "Email" in the domain settings and disable it.
- Then check the DNS records list: any MX records that do not point to your email host should be gone.
Step 3: Add the MX record
Add one MX record for the bare domain:
- Host / Name:
@(some panels want it left blank) - Mail server / Value:
my.mailbux.com - Priority:
10
Make sure this is the only MX record on the domain.
Step 4: Add SPF, DKIM and DMARC
Without these, your first emails are likely to land in spam, because receiving servers cannot confirm you are allowed to send as your domain.
- SPF: one TXT record at
@containinginclude:msg25.com, for examplev=spf1 include:msg25.com ~all. A domain must have only one SPF record; if the registrar already created one, edit it instead of adding a second. Our guide to merging multiple SPF records shows how. - DKIM: copy the exact name and value from Manage → DNS. The value is long; paste it in one piece.
- DMARC: copy the record from Manage → DNS. You can start with a monitoring policy and tighten it later.
For a field-by-field walk-through of the record forms most DNS panels use, see how to add DNS records for your email domain.
Step 5: Decide what to do with the parking page
A parked domain usually has an A record or a redirect pointing to the registrar's "this domain is parked" page. That page does not affect email at all, so you can leave it. Two optional improvements:
- Keep it parked if you will build a site later. Nothing to do.
- Point the domain at an existing profile, such as a social page or directory listing, with the registrar's URL redirect feature. Redirects only change web records, so your MX and TXT records stay as they are.
The one thing to avoid: some "parking" or "redirect" options replace the whole DNS zone. If a setting warns that it will change your nameservers or reset your records, do not use it, or re-check your MX and TXT records afterwards.
Step 6: Verify, then create your mailboxes
- Compare every record in your DNS panel with the values under Manage → DNS, character by character.
- Create your mailboxes, for example
hello@,info@and your own name. - Send a test message from a personal address to the new one, and reply to it.
If something is not passing, our checklist to verify your email DNS records covers each record and the usual typos.
Step 7: Set up your devices
- Webmail and the Mailbux apps: sign in with the full email address.
- Desktop and mobile mail clients: IMAP
my.mailbux.comport 993 SSL/TLS, SMTPmy.mailbux.comport 587 STARTTLS, user name = full email address. IMAP sign-in needs a paid plan; Free accounts use webmail, the Mailbux apps and SMTP.
Common questions
Will adding a website later break my email?
No, as long as the web setup only changes web records (A, AAAA, CNAME for www). The risk is a website builder or web host that asks you to switch nameservers. If you do that, copy your MX, SPF, DKIM and DMARC records into the new DNS zone before you switch, or mail will stop arriving.
Do I need web hosting to get email on my domain?
No. Email hosting and web hosting are separate services. You can have either one without the other.
Can I use a domain I only just registered?
Yes. A new domain can receive mail as soon as its MX record is published. Sending from a brand-new domain is easier on deliverability if SPF, DKIM and DMARC are in place from day one and you start with normal day-to-day volumes.
How many addresses can I have?
On paid Mailbux plans you can create unlimited business mailboxes, limited only by your plan's storage: each mailbox gets at least 1 GB of it. Mail is stored on servers in the EU, US and Canada.
Quick checklist
- Domain added to your email host; values open under Manage → DNS
- Registrar email forwarding switched off; no foreign MX records left
- One MX:
@→my.mailbux.com, priority 10 - One SPF with
include:msg25.com; DKIM and DMARC copied exactly - Records match Manage → DNS exactly; test message sent and replied to
- Devices set up; parking page left alone or redirected without touching mail records
Ready to get your address working? Create your Mailbux account and add your domain. No website required.