
How to Add a Second Domain to Your Business Email
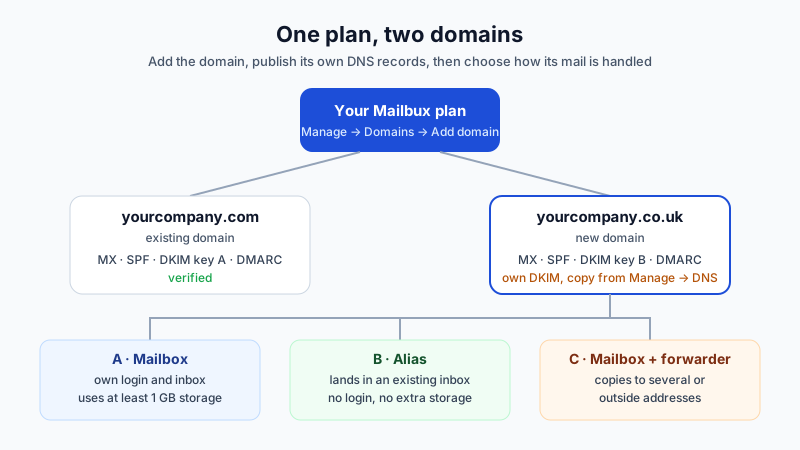
You already have email working on yourcompany.com. Now you have bought yourcompany.co.uk, launched a second brand, or taken on a side project, and you want email on that domain too. The good news: you do not need a second account, a second bill or a second login. You add the domain to the same plan, publish its DNS records, and then decide how mail on the new domain should be handled.
This guide walks through the whole process in Mailbux, and the three choices that matter: separate mailboxes, aliases into an existing mailbox, or a forward to one inbox.
Before you start: what you need
- Access to the DNS settings for the new domain (usually at the registrar where you bought it, or your DNS host).
- Your existing Mailbux account at dash.mailbux.com.
- A plan with room for another domain. Paid plans include unlimited business mailboxes (each uses at least 1 GB of plan storage) and more domains than Free. The Free plan includes 1 domain and up to 7 mailboxes; the current numbers are on the pricing page.
If the new domain currently receives mail somewhere else, read the section on live domains below before you change its MX record.
Step 1: Add the domain to your plan
- Sign in to dash.mailbux.com and open Services → your plan → Manage → Domains.
- Choose Add domain, enter the new domain (for example yourcompany.co.uk) and save.
The domain now appears in your list, together with the DNS records it needs. Each domain has its own records, including its own DKIM key, which Mailbux generates for you. You never create keys yourself.
Step 2: Publish the DNS records for the new domain
Open Manage → DNS, select the new domain and copy the records into the DNS settings at your registrar. For each domain you add, these are the records:
| Record | Host | Value |
|---|---|---|
| MX | @ | my.mailbux.com, priority 10 |
| TXT (SPF) | @ | v=spf1 include:msg25.com ~all |
| TXT (DKIM) | as shown in Manage → DNS | copy the exact value for this domain |
| TXT (DMARC) | _dmarc | copy the exact value from Manage → DNS |
Three mistakes we see often when people add a second domain:
- Reusing the first domain's DKIM value. DKIM is per domain. Copy the record shown for the new domain, otherwise its outgoing mail fails DKIM checks.
- Adding a second SPF record. If the new domain already has an SPF record (for example from a website builder or newsletter tool), merge everything into one record. Two SPF records on the same domain cause a permanent error. See how to merge multiple SPF records.
- Putting the records on the wrong domain. Registrars often list all your domains on one screen. Check the domain name at the top of the DNS editor before you save.
If your registrar's screens look unfamiliar, our step-by-step guide to adding DNS records covers the common layouts.
Step 3: Wait for verification
DNS changes usually show up within minutes to a few hours, but they can take longer depending on the old TTL values. When the records are visible, the domain shows as verified. You can check each record with the free lookup tools on the site (MX lookup, SPF lookup, DKIM lookup). Only added and DNS-verified domains appear in the domain dropdown when you create aliases.
Step 4: Decide how the new domain's mail should work
This is the part most guides skip. Once the domain is verified, you have three sensible options. Most businesses use a mix.
Option A: Separate mailboxes on the new domain
Best when different people or a separate brand use the new domain and need their own inbox, password and storage. Open Manage → Mailboxes → Create mailbox, pick the new domain from the dropdown, and set the address, password and storage (at least 1 GB per mailbox). Each mailbox signs in on its own, in webmail or in any mail app.
Option B: Aliases into a mailbox you already have
Best when the same person answers mail on both domains. For example, you want [email protected] to land in your existing [email protected] inbox. Open Manage → Aliases, choose the new domain, enter the alias address and pick the existing mailbox it delivers into. An alias has no login of its own and uses no extra storage. The full walkthrough, including how to send from the alias, is in how to create email aliases.
Option C: Forward mail on to other addresses
Best when mail must reach several people or an address outside your account. Forwarders in Manage → Forwarders send mail from an existing mailbox on to one or more addresses. Because a forwarder starts from a mailbox, create one on the new domain first (Option A), then add the forward.
| You want… | Use | Own login? | Uses storage? |
|---|---|---|---|
| A new person or brand with its own inbox | Mailbox | Yes | Yes, at least 1 GB |
| New addresses landing in your current inbox | Alias | No | No |
| Mail sent on to several or outside addresses | Mailbox + forwarder | Yes (the mailbox) | Yes (the mailbox) |
If the new domain already receives email somewhere else
If the domain is live with another provider, do not switch the MX record first. Create the mailboxes and aliases on Mailbux, move any old messages you want to keep, and only then point MX to my.mailbux.com. During the switch, some senders may still deliver to the old server for a while because of DNS caching, so keep the old mailboxes open for a few days. Our article on why mail seems missing after an MX change explains the timing. To copy old messages across, use the free migration tool, or ask in a support ticket for free migration help for up to 10 mailboxes.
Sending from the second domain
- Separate mailbox: sign in with that mailbox's full address. Webmail and mail apps send from it automatically. Server settings are the same for every domain: the server is
my.mailbux.com, and your username is the full email address. - Alias: in Mailbux Webmail, pick the From address in the dropdown above the To field. In Outlook, Apple Mail or Thunderbird, add the alias as an extra sending identity.
Send a test message from the new domain to an outside inbox and check the message headers: you want SPF pass and DKIM pass for the new domain. If DKIM fails, the most common cause is a DKIM record copied from the other domain or pasted with a missing character.
Common questions
Does a second domain cost extra?
Paid plans include more domains than Free; no per-user fees. They also include unlimited business mailboxes (each uses at least 1 GB of plan storage), so storage is the only thing that grows. The Free plan includes 1 domain; if you need a second one, upgrade to a paid plan.
Can one person have addresses on both domains in a single inbox?
Yes. Keep one mailbox and add aliases on the second domain (Option B). Everything lands in one inbox and you choose the From address when you write.
Do I need a different DKIM or DMARC record for each domain?
Yes. Each domain has its own DKIM key and its own DMARC record. Copy both from Manage → DNS for that specific domain.
I manage many client domains. Is there a better setup?
For agencies and IT providers, look at the reseller and white-label plans.
Get started
Add your second domain in a few minutes from Manage → Domains. Mailbux paid plans include unlimited business mailboxes (each uses at least 1 GB of plan storage) and more domains than Free, and your mail is hosted on servers in the EU, US and Canada. You can start on the Free plan with up to 7 mailboxes.