
How to Switch Email Hosts With Zero Downtime: A Timed Checklist
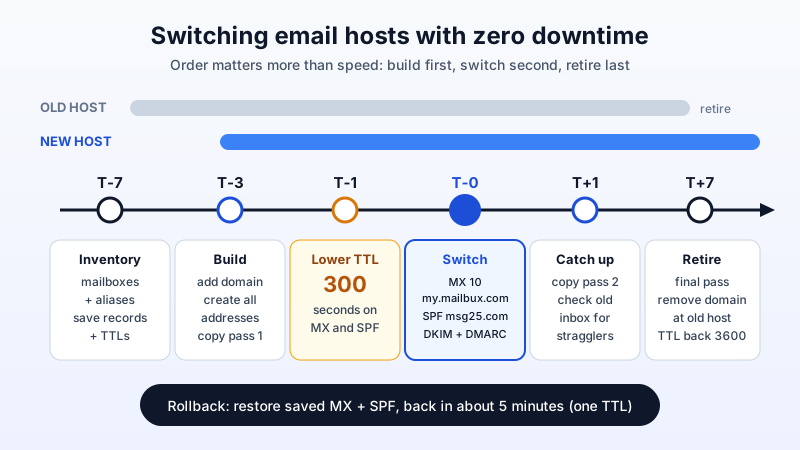
Switching email hosts does not have to mean a weekend of bounced messages and confused staff. Almost every "downtime" story comes from doing things in the wrong order: changing the MX record before the new mailboxes exist, or changing it while the old record is still cached for a full day. This checklist is about the timing of the switch: what to do a week before, the day before, during the cutover hour, and the week after, plus a rollback plan you can execute in minutes.
It does not repeat the full copy procedure (that is in how to migrate your business email without losing a single message), and it does not cover troubleshooting after the fact (see email missing after changing MX records). Use it to plan the switch so you never need the second article.
Why a well-planned switch has no real downtime
When you change your MX record, the internet does not switch over at one instant. Each resolver keeps the old answer until its cached copy expires, which is controlled by the record's TTL (time to live, in seconds). During that window, some senders deliver to the old host and some to the new one.
That overlap is harmless as long as two things are true:
- Both hosts accept mail for every address on your domain during the overlap.
- The overlap is short, because you lowered the TTL in advance.
If both are true, no message bounces, and you collect the few that landed on the old host with a final copy pass. That is what "zero downtime" means in practice: no rejected mail and no gap in sending, not that every message arrives at the new host from the very first second.
T-7 days: inventory and preparation
- List every address. Real mailboxes, aliases (info@, billing@, sales@), forwarders and catch-alls. Aliases are the item people forget most often, and a missing alias becomes a bounce after cutover.
- Find where your DNS is actually hosted. Look up your domain's nameservers. Edits only count at the provider those nameservers point to, which is not always your registrar or your website host.
- Write down the current records. Save the current MX, SPF (TXT), DKIM and DMARC values and their TTLs in a text file. This file is your rollback plan.
- Check the old MX TTL. Common values are 3600 (1 hour), 14400 (4 hours) and 86400 (24 hours). You need this number for the T-1 step.
- Check your contract. Make sure the old service stays active for at least a week after your planned cutover date. Cancelling the old host on switch day is the single most common cause of lost mail.
T-3 days: build the new side completely
Everything on the new host should exist before a single DNS record changes:
- Add the domain in the new provider's dashboard.
- Create every mailbox and every alias from your inventory list. In Mailbux you can create unlimited business mailboxes, each using at least 1 GB of your plan's storage, so size the plan for the mailboxes you actually need.
- Run the first copy pass with the Mailbux migration tool. This moves years of old mail while nobody is waiting on it, so the final pass after cutover only has to pick up a few days of new messages.
- Log in to webmail on the new side and confirm folders and message counts look right.
T-1 day: lower the TTL
Change the TTL of your existing MX record to 300 seconds (5 minutes). Do not change the value of the record yet, only its TTL.
The timing matters: resolvers that cached the record before you lowered the TTL keep it for the old TTL. If your old TTL was 86400, lower it at least 24 hours before cutover. If it was 3600, a few hours ahead is enough, but the day before is the safe habit. Some DNS providers enforce a minimum TTL; if 300 is not allowed, use the lowest value they accept.
Lower the TTL on the SPF TXT record at the same time, so the SPF change at cutover also spreads quickly.
Cutover hour: the actual switch
Pick a quiet time, for most businesses early morning or a weekend. Then, in this order:
- Replace the MX record. Remove the old MX entries and add
my.mailbux.comwith priority10. Do not leave the old MX in place at a higher number: senders treat it as a backup and keep delivering there whenever they like. - Update SPF. Your single SPF record must include
include:msg25.com. If anything still sends on behalf of your domain from the old provider (for example, a website form), merge both includes into one record; never publish two SPF records. See how to merge multiple SPF records into one. - Add DKIM and DMARC. Copy the exact values from your Mailbux dashboard under Manage → DNS.
- Verify. Run an MX lookup from outside your network and confirm it shows only
10 my.mailbux.com. Our guide on verifying your email DNS records walks through each check. - Send test messages from an outside account (a personal mailbox works) to two or three of your addresses, including one alias, and reply from the new host to confirm sending works.
With a 300-second TTL, most senders follow the new record within minutes.
Cutover hour: move people, not just records
Staff need to read and send from the new host from the moment the MX changes. Prepare a one-page note in advance with the new settings:
- Webmail and the Mailbux apps: sign in with the full email address.
- Desktop and mobile clients: IMAP
my.mailbux.comport 993 SSL/TLS, SMTPmy.mailbux.comport 587 STARTTLS, username is the full email address. IMAP sign-in needs a paid plan; Free accounts use webmail, the Mailbux apps and SMTP.
Tell people to keep the old account in their mail client for a few days, but to send only from the new one.
T+1 to T+7: close the gap
- Day 1: run the second copy pass. Its job is to pick up anything delivered to the old host during the overlap; check the migration log and spot-check the old inbox against the new one.
- Days 1-3: watch for bounce reports and for anyone saying "I did not get your email". Check the old inbox first; that is where stragglers land.
- Day 7: run a final copy pass, then remove the domain from the old provider (tenant, hosting panel or email routing) so it stops accepting mail for your domain.
- After that: raise the MX TTL back to 3600 and cancel the old service once you are satisfied nothing is still arriving there.
The rollback plan
Because you lowered the TTL and kept the old service alive, rolling back is quick:
- Restore the MX and SPF values from the text file you saved at T-7.
- Within about five minutes (one TTL), most senders deliver to the old host again.
- Anything that arrived at the new host in the meantime stays there; copy it back with the same migration tool if needed.
Decide your rollback trigger in advance, for example "test messages not arriving within 30 minutes of the switch", so nobody has to make the call under pressure. In practice, when the new side was fully built at T-3, the rollback plan is rarely used, but having it is what makes the switch calm.
The checklist on one screen
- T-7: inventory addresses and aliases, find the DNS host, save current records and TTLs, keep the old service paid.
- T-3: add domain, create all mailboxes and aliases, first copy pass.
- T-1: lower MX and SPF TTL to 300 (or the old TTL's length ahead of time).
- T-0: MX to
10 my.mailbux.comonly, SPF withinclude:msg25.com, DKIM and DMARC from Manage → DNS, verify, test, send settings to staff. - T+1: second copy pass, watch the old inbox.
- T+7: final pass, remove the domain from the old provider, raise the TTL, then cancel.
Planning a switch? Mailbux gives you unlimited business mailboxes (each mailbox uses at least 1 GB of your plan's storage), every DNS value ready to copy in your dashboard and a migration tool for the copy passes, on servers in the EU, US and Canada. Start free.