
Email Missing After Changing MX Records? Where It Went and How to Get It Back
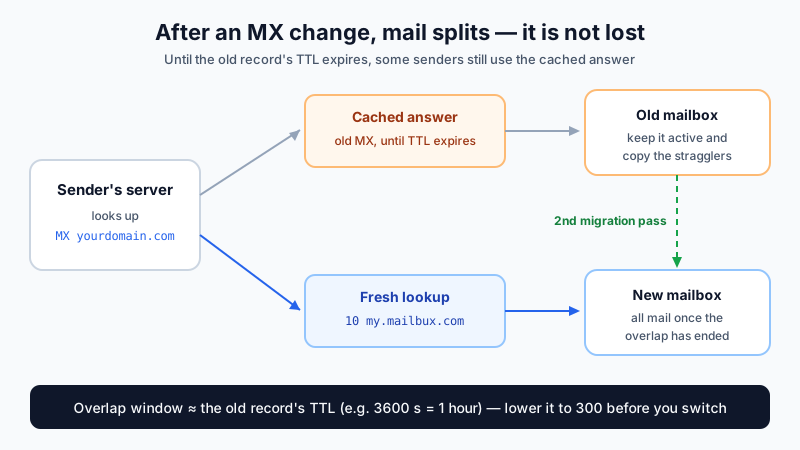
You changed your domain's MX record to point at your new email provider, and now some messages are missing. A few people say their mail bounced, others say it went through, and your new inbox is strangely quiet. This is almost always a transition-window problem, not lost mail. This guide explains what happens during the hours after an MX change, where the "missing" messages actually went, and the checks that bring every message back into one inbox.
What happens when you change an MX record
When someone sends you an email, their mail server looks up your domain's MX record in DNS to find out where to deliver it. That answer is cached. The cache lifetime is the record's TTL (time to live), set in seconds at your DNS provider. A TTL of 3600 means a server that looked up your MX record a minute before your change can keep using the old answer for up to an hour.
So for a while after the change, the internet is split:
- Senders with a fresh lookup deliver to your new provider.
- Senders with a cached answer still deliver to your old provider.
- Senders inside your old provider's own system may never look at DNS at all (more on that below).
Mail is not lost in this window. It lands in one of two places, and your job is to make sure you can read both until the old one goes quiet.
Step 1: Confirm the new MX record is actually published
Before blaming caches, check that the change itself is correct. Look up your domain with a public tool such as our MX lookup tool, or from a terminal:
dig +short MX yourdomain.com
nslookup -type=mx yourdomain.com 1.1.1.1
For a Mailbux domain the only answer should be:
10 my.mailbux.com.Common mistakes we see at this step:
- The old MX records are still there. If the lookup returns both the old host and
my.mailbux.com, senders will keep picking the old one — permanently, not just during the transition. Delete every old MX record. - The record was added at the wrong DNS provider. If your domain's nameservers point to your web host but you edited the zone at your registrar (or the other way round), the change is invisible. Check which nameservers are authoritative with
dig +short NS yourdomain.comand edit the zone there. - A typo or a stray dot. Some DNS panels append your domain automatically, turning
my.mailbux.comintomy.mailbux.com.yourdomain.com. Look at the published result, not at what you typed. - The MX points at an IP address. MX records must point to a hostname, never directly to an IP.
If the lookup shows exactly one correct record, DNS is fine and the rest is timing. Our guide on adding DNS records for your email domain shows where these settings live at the common DNS providers.
Step 2: Work out how long the overlap lasts
The overlap window equals the old MX record's TTL, because that is what other servers cached. Check the TTL your DNS provider had set before the change (often 3600 seconds, sometimes 14400 or 86400). Add a margin: a few resolvers hold records longer than they should. In practice:
- TTL 300–3600: the overlap is usually over within a few hours.
- TTL 14400–86400: plan for one to two days.
The often-quoted "up to 48 hours" is a safe upper bound, not a rule. If you are still planning a move, lower the TTL to 300 a full TTL period before you switch, and the overlap shrinks to minutes.
Step 3: Read the old mailbox until the overlap ends
This is where most "missing" mail is hiding. During the overlap, messages from senders with cached DNS are delivered — successfully — to your old provider. They are not bounced and not lost; they are sitting in the old inbox.
- Do not cancel or delete the old mailbox on the day you change the MX record. If you do, those senders receive a bounce ("user unknown" or "mailbox unavailable") and the message really is lost from your side.
- Keep the old account active until at least one full old-TTL period has passed and nothing new has arrived in it for a day.
- Then copy the stragglers across. With the Mailbux migration tool you can run a second pass from the old account; it copies the messages that arrived after the first run and skips the ones already copied. Our full migration guide covers this "catch-up run".
Step 4: Check whether the old provider still thinks it owns your domain
If mail from specific senders keeps going to the old inbox long after the TTL has expired, the old provider is probably delivering it internally without looking up DNS. Typical cases:
- Google Workspace or Microsoft 365. While your domain is still added to the old tenant, messages from other users in that same tenant (and sometimes from automated services tied to it) are delivered inside that system. Remove the domain from the old tenant, or delete the old users, once your data is copied.
- Shared web hosting. Many hosting panels have an email routing setting (often called "local" vs "remote" mail exchanger). If it is still set to local, contact forms and notifications sent from your own website are delivered to the old mailboxes on the web server. Switch it to remote.
- Your colleagues' email apps. If someone's desktop app still has the old account configured, they are reading the old inbox and think new mail is missing. Set up the new account in their apps and remove the old one.
Step 5: Look at the bounces you did receive
If a sender forwards you a bounce, the text tells you which side rejected the message:
- Bounce from your old provider's server ("mailbox does not exist", "account disabled"): the sender had cached the old MX and the old account was already gone. Ask them to resend; their server will look up the new MX now.
- Bounce mentioning my.mailbux.com with "user unknown": the address does not exist on the new side. Create the mailbox or an alias for it — check the spelling, and remember shared addresses like
info@orbilling@that existed as aliases at your old provider. - "Message delayed" warnings, no bounce: the sender's server could not reach either host and is retrying. Sending servers normally keep retrying for several days (the SMTP standard recommends at least four to five) before giving up, so these usually arrive on their own.
Step 6: Update SPF so your replies are not the next problem
Incoming mail follows the MX record; outgoing mail is judged by SPF, DKIM and DMARC. Changing MX alone does not change those. For Mailbux, your SPF record needs include:msg25.com, and your DKIM and DMARC values are shown in your dashboard under Manage → DNS, ready to copy. Keep a single SPF record per domain; if the old provider's include is still needed for a while, merge both into one record, as explained in how to merge multiple SPF records into one.
A quick checklist
- Lookup shows only
10 my.mailbux.com— no old MX left. - Edited at the DNS provider your nameservers point to.
- Old mailbox kept active for at least one old-TTL period plus a day.
- Second migration pass run to copy the stragglers.
- Domain removed from the old provider's tenant or hosting email routing.
- Every address that existed before exists now, as a mailbox or an alias.
- SPF includes
msg25.com; DKIM and DMARC copied from Manage → DNS.
Work through the list in order and the "missing" messages almost always turn up in the old inbox, not in a void.
Moving your domain's email? Mailbux gives you unlimited business mailboxes (each mailbox uses at least 1 GB of your plan's storage), with every DNS value shown in your dashboard and a migration tool for the copy, on servers in the EU, US and Canada. Start free.